How to install a bidet? | 7 easy steps to follow
Here are the seven steps for your query about installing a bidet.
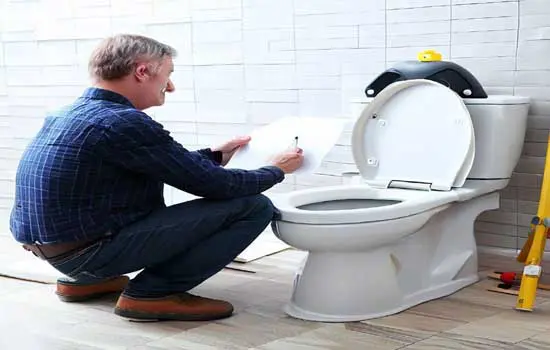
Installing a bidet seat to your existing toilet bowl is the last step of your home innovation plan for your bathroom. You went through steps investigating to choose the right bidet shape and finding more details about your bathroom for the correct installation.
Now you need to install your bidet seat.
We assume that you already have a bidet seat. Most modern bidet seats require similar procedures and kits for installation.
Living Star bidet seat configuration
Below is the bidet seat configuration. The image to the left is a remote bidet, Living Star 7900, and the right image is the other Living Star 5900 and 7500 models.
Overview of a bidet seat
Let us show you each part that you may know already.
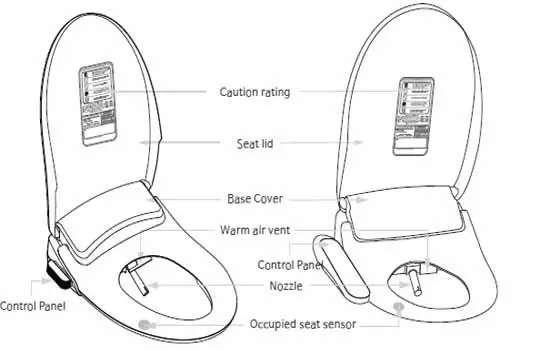
- Lid: The lid is a simple part attached to the seat with perforated holes.
- Caution rating: This serves as a warning and caution message to you. It also states input voltage and other information, including the contact information of the Living Star.
- Base cover: This part works as a bridge between the lid and the bidet unit, which also works as a cover for the bidet unit.
- Warm air vent: Works to protect from water droplets and other pollutants that may reach the air base. The vent will open when you press the drying key.
- Control panel: A keyboard that is attached to the bidet seat.
- Occupied sensor: A body sensor enables keystrokes when you sit; otherwise, it blocks any keystrokes to prevent an accidental operation.
An upside-down view of a Living Star bidet seat

If you turn the bidet seat upside down, then you will see:
- A tubing hose: Also called a water hose that connects from a T-valve connector to the bidet seat.
- Fixing plate: A removable plate sits on the toilet bowl to fix the bidet seat to the bowl.
- Detachment hook: A release button for the entire bidet seat removal from the toilet bowl.
- Power plug: The power plug works in the US 120V AC.
Bidet seat installation kit
Living Star offers a complete installation kit. You do not need to purchase a part to install it.
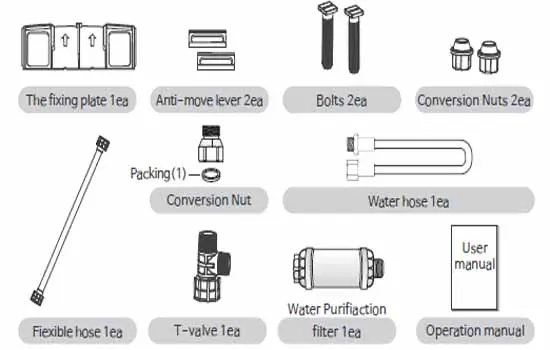
Here is what the package comes, as shown in the image above:
- Fixing plate: A plate connecting the bidet seat and toilet bowl.
- Anti-move level (2 pieces): The level works as a small plate with holes for bolts insertion into the toilet bowl holes.
- Fixing nuts: Locking the bolts on the anti-move level from the end of the toilet bowl.
- Water hose: It connects the T-valve output to the bidet unit.
- Flexible hose: Please replace the old hose connecting the water opening to the tank. Replace that hose with the new one provided in the package.
- T-valve and conversion nut: It serves to connect 1/2″ or 3/4″ water openings.
- Water filter: The Living Star bidet package includes a water filter as default.
Step-by-step installation procedure
No sweat, it’s easy!
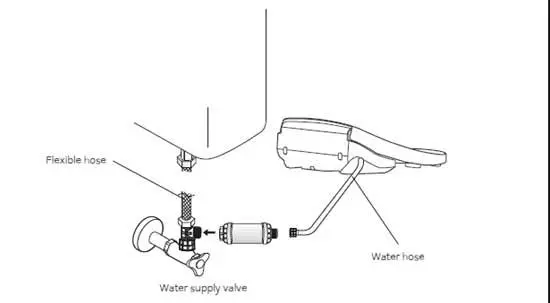
| Step 1: Turn the water supply off. | Step 2: Connect the T-valve to the water opening. |
 |
 |
| Step 3: With the new flexible hose includes with the package, connect it to the T-valve and toilet water tank. | Step 4: Remove the old lid, then unlock the nuts. |
 |
 |
You have almost finished installation!
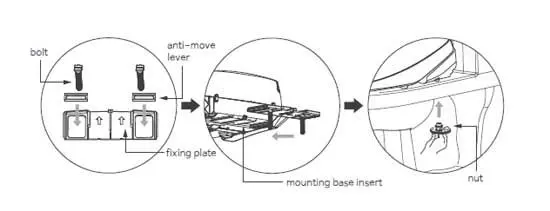
Step 5: Locate the fixing plate shown in the image below. Then lock the fixing plate with the nuts to install the fixing plate.
Step 6: Installing the water filter
You can skip this if you do not want to use the water filter that comes with the package.
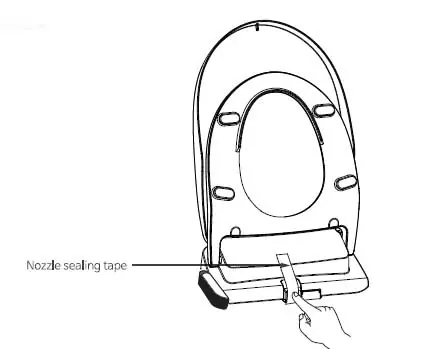
Step 7: Remove the nozzle seal tape in the bidet seat. Note that the seal tape protects the nozzle from pressures during transport.
Congratulations!
You just completed the installation. Now check to see if the bidet seat works correctly; either sit or press the body sensor down to enable the washing key, then press a wash key to see if the wash works. Once you see water come out, you successfully install the bidet, completing your query on how to install a bidet.
Leave a Reply